Enable HTTPS on influxdb for debian

To enable HTTPS on influxdb for debian do the following.

Get a certificate. Easy way is to let debian do it for you. The ssl-cert package will generate a self signed cert.

apt-get install ssl-cert

Now pipe the key and pem to somewhere influxdb can get to it. 

cat /etc/ssl/private/ssl-cert-snakeoil.key /etc/ssl/certs/ssl-cert-snakeoil.pem > /etc/influxdb/influxdb.pem

Then turn on https in your /etc/influxdb/influxdb.conf and point to your new pem.

vi /etc/influxdb/influxdb.conf
[admin]
  enabled = true
  bind-address = ":8083"
  https-enabled = true
  https-certificate = "/etc/influxdb/influxdb.pem"

[http]
  enabled = true
  bind-address = ":8086"
  auth-enabled = true
  log-enabled = true
  write-tracing = false
  pprof-enabled = false
  https-enabled = true
  https-certificate = "/etc/influxdb/influxdb.pem"

Start up influxdb and you’re done.

service influxdb restart
 

Bash: Run command if exists, else echo blank

Useful if you want to only output something if a command exists.

if $(type YOUR_COMMAND &> /dev/null); then RUN_YOUR_COMMAND; else echo ""; fi

For example, I use this on my Proxmox hypervisors with ZFS to get status. Not all my hypervisors have zfs arrays. Makes it easy to blanket ssh to all hypervisors and get zfs status if it exists. For a custom status page I wrote.

if $(type zpool &> /dev/null); then zpool list; else echo ""; fi


Proxmox and Quagga and OSPF

A few quick notes on getting Proxmox running with Quagga routers so they can serve up OSPF routes. I did this with Proxmox 3.1-3 and Quagga 0.99.22.4-1+wheezy1.

  1. apt-get update
  2. apt-get install quagga
  3.  vi /etc/quagga/daemons
    • turn on zebra and ospfd
  4. cp /usr/share/doc/quagga/examples/vtysh.conf.sample /etc/quagga/vtysh.conf
  5. cp /usr/share/doc/quagga/examples/ospfd.conf.sample /etc/quagga/ospfd.conf
  6. cp /usr/share/doc/quagga/examples/zebra.conf.sample /etc/quagga/zebra.conf
  7. modify above conf files if you want (can leave default)
  8. turn off annoying splash screens in vtysh
    • vi /etc/bash.bashrc
    • export VTYSH_PAGER=more
    • source /etc/bash.bashrc
  9. service quagga restart
  10. vtysh
  11. configure terminal
  12. router ospf
  13. set the ospf id name. Usually set to this machine’s IP (replace <MACHINE_IP> below)
    • router-id <MACHINE_IP>
    • eg router-id 192.168.1.1
  14. specify networks to route and for what ospf area
    • network <IP>/<CIDR> area <AREA>
    • eg. network 192.168.1.0/24 area 1
  15. end
  16. copy running-config startup-config
  17. now start watching `show ip route` for the routes to show up from other ospf routers with an O in the front.
    • can also look at `show ip ospf neighbor` to see your ospf neighbors.

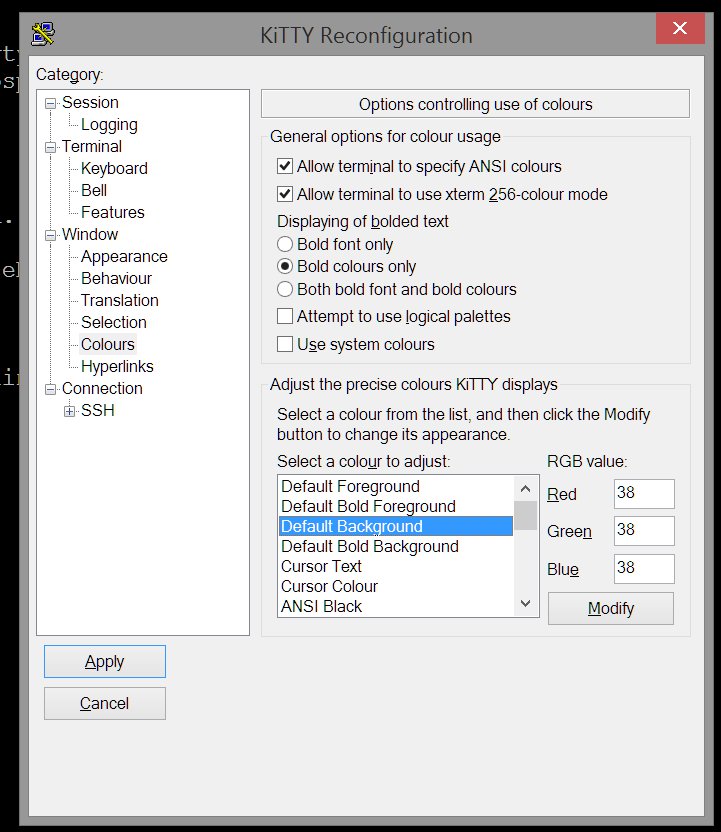
Change terminal backgrounds to identify

If you’re like me and start forgetting which terminal is which, try changing their background so it’s easier to tell. Most modern terminals can do this out of the box. In putty (and KiTTY) it’s a simple as: Screenshot_031415_095752_PM

I like to do this on terminals that have critical connections up (like a primary router). So I don’t accidentally type something wrong in there… 🙂

Fish shell and Putty

If you run into some weird characters while using Fish shell from Putty, try changing Putty’s remote character set to UTF-8:

Right Click Putty -> Change Settings -> Window -> Translation -> Remote Character Set -> UTF-8.

Before and after:

jdrews@arch ~> vi /home/jdrews/.config/fish/fish
â¦fish/fish_history  â¦fish/fishd.00155d03510c
jdrews@arch ~> vi /home/jdrews/.config/fish/fish
…fish/fish_history  …fish/fishd.00155d03510c

And if your Home and End keys don’t work, try putting this into your config.fish file .

jdrews@arch ~> cat ~/.config/fish/config.fish
function fish_user_key_bindings
        bind \e\[1~ beginning-of-line
        bind \e\[3~ delete-char
        bind \e\[4~ end-of-line

end