If you’re using SuperPutty (http://code.google.com/p/superputty/) and KiTTY (http://www.9bis.net/kitty/) there is a slight bug where the passed in -cmd on the Extra Putty Arguements won’t work. It turns out, KiTTY ignores the -cmd argument when a -load is added, and SuperPutty uses this argument to load the session.
Fix for now: Make sure your Putty Session Profile is blank. This will stop the -load argument from being passed to KiTTY, and will allow your -cmd argument to work.
I’ve asked KiTTY to allow the -cmd to overwrite any autocommand in a -load session. As of these versions, this bug still exists:
SuperPutty 1.3.0.11
KiTTY: 0.62.1.3
Update Nov. 11th
I figured out kitty_portable.exe will use what you put in the “Default Settings” profile even if you don’t specify this session on -load. The regular kitty.exe was not doing this. Very handy!
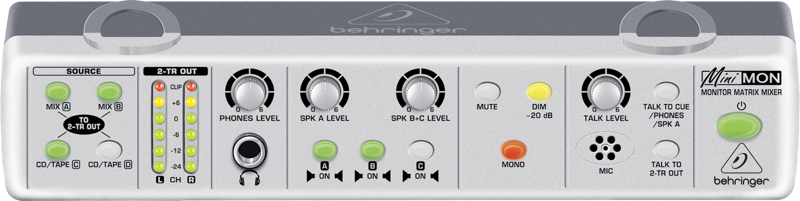
I wanted a way to mix my audio signals coming from my computer, XBox, and TV into the same audio stream. The device you use to do this is called a matrix mixer. Generally they’re 1000+ USD. But I found a product that’s designed for home recording studios that will do it on the cheap.
At around 60 bucks, this is quite the steal. It’ll mix up to four stereo analog inputs into 1 stereo stream that can be outputted on 4 stereo outputs. Two of those outputs (B+C) are controlled by one volume knob, while the other two (Headphone Out and A) have individual volume controls.
So why do you want this? Well now I can listen to some music on my home theater while I play xbox through the same speakers. I also never loose audio signal when my computer turns off the TV. I’ve also mixed my home recording onto one of the channels so I can jam out over the home theater speakers without having to click any buttons on my remote.
Granted, this will only handle stereo setups. I use it on a 2.1 setup. Sounds great over my Boston Acoustics floor standings and a Mirage sub. I can’t hear any degrade in signal from when I was running optical to the Denon Receiver.
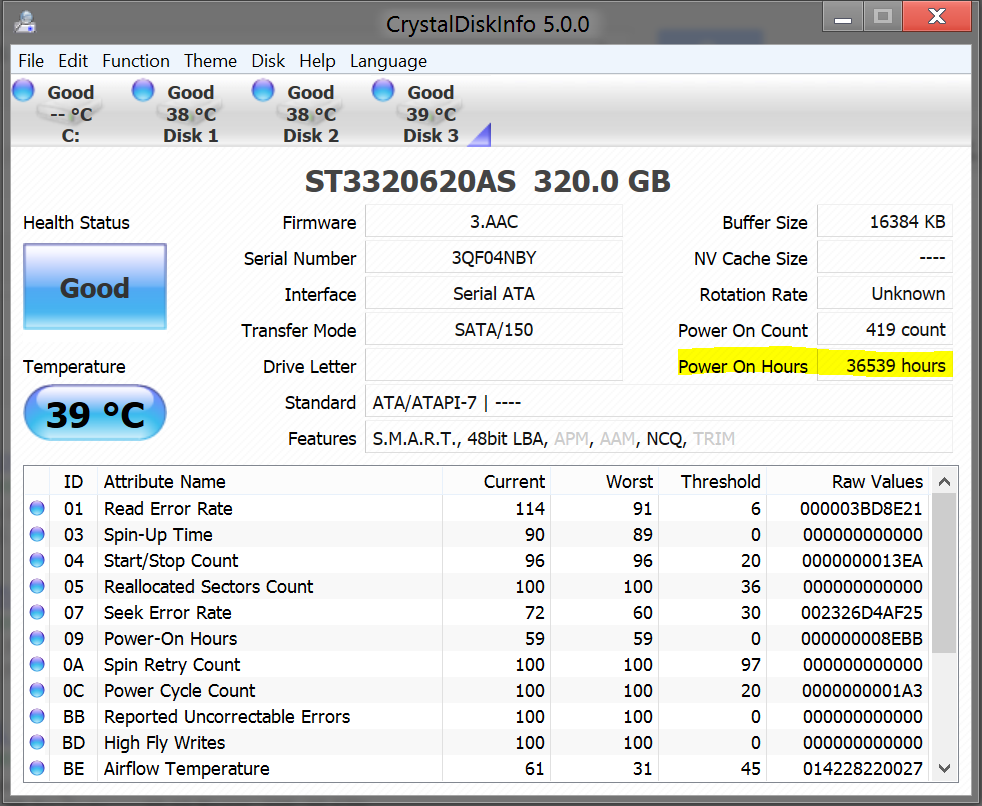
S.M.A.R.T has an interesting feature I just noticed. It will tell you how many hours your drive has been turned on. One useful tool to read this S.M.A.R.T info is CrystalDiskInfo.
Here’s a screenshot of one of my drives that’s been running for 4.17 years.
I just recently bought a new computer with the purpose of
Replacing my dying HTPC
Setting up a VM Server for all my little projects
I wanted to be able to kill two birds with one stone on this purchase. So I turned to VT-d (also known as IOMMU, Directed I/O, and AMD-V). This allows a hypervisor to provide direct I/O access to a piece of hardware. You can get really excellent performance out of it as in this youtube video:
Yes, that’s one computer running two (really 3 if you count dom0) operating systems playing two games at once. Essentially it’s one computer acting as two computers. Notice the smooth (i.e. lag free) graphics.
Here’s the parts I picked up (~<$1000):
Intel Core i7 3770 (don’t get a K, as these don’t have VT-d)
ASRock Z77 Extreme4 (this mobo was shown to support VT-d here)
Crucial Ballistix Sport DDR3-1600 CL9 2x8GB
NZXT Classic Series Source 210 Case
SeaSonic X-Series 660W Power Supply
Crucial M4 128GB SATA SSD
Western Digital RE4 WD5003ABYX 500GB 7200rpm
Vantec 2 Channel 4-Port SATA 6Gb/s PCIe Host Card
SAPPHIRE AMD Radeon HD 6450 1GB PCIe Video Card
I threw Fedora 17 x86_64 on the WD RE4 as my dom0. Then I followed Dizzy’s Create a Gaming Virtual Machine Guide @ overclock.net. Mad props to Dizzy for a great guide.
Here it is working. This is a screen shot of a Windows 7 VM running as domU on xen.
I passed through the HD 6450 video and audio (HDMI) pci devices to the Windows 7 VM. I also passed a usb controller so I could use a mouse and keyboard.
The result is that I have a VM that has pretty much no performance loss. I ran Furmark on this system, while native and while inside the VM on HDMI to my TV. There was no frame loss (granted Furmark only runs at 5 fps @ 1024×768 on this card).
You’ll notice that this card has a really low Aero performance. Not sure why, but I found that while running Windows natively as well. A quick check online shows it’s happening with others as well. I don’t really notice it so oh well.
There are a few issues with this setup. First off I couldn’t get my pci-passthrough’s to persist over restarts of the host dom0. So I wrote a script that detaches the pci devices from dom0 and then starts the VM.
#!/bin/bash

#01:00.0 VGA compatible controller: ATI Technologies Inc NI Caicos [AMD RADEON HD 6450]
virsh nodedev-dettach pci_0000_01_00_0

#01:00.1 Audio device: ATI Technologies Inc NI Caicos HDMI Audio [AMD RADEON HD 6450]
virsh nodedev-dettach pci_0000_01_00_1

#00:1d.0 USB Controller: Intel Corporation Panther Point USB Enhanced Host Controller #1 (rev 04) -- 2x grey 2.0 ports on back.
virsh nodedev-dettach pci_0000_00_1d_0

xm start win777
Unfortunately, I couldn’t get this to work when I placed it int /etc/rc.d/rc.local as xend hadn’t started yet when rc.local was run. So I can only start my Win7 VM manually.
Another way I tried to fix the above issue is by using xen-pciback.hide feature on the dom0 kernel so it doesn’t take over these pci devices. I placed the following line in /etc/sysconfig/grub
That didn’t work either. As far as I can tell it has something to do with my kernel lacking modprobe modules.
The second issue is that the HDMI Audio crashes after the system has been up for a while. I plan on leaving this machine on all the time (running Rosetta@Home when I’m gone). This is supposedly a known issue, at least to Dizzy (not sure about Xen).
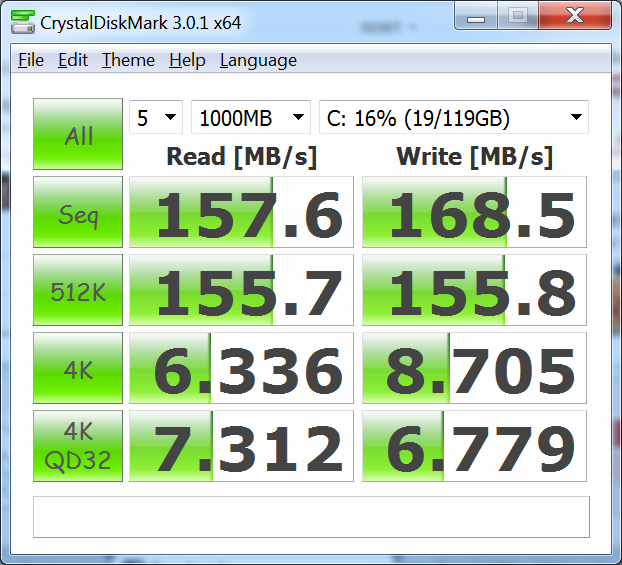
I got a little confused about the hard drive setup. My initial plan was to passthrough the SATA PCIe card I bought. This should have worked. In fact, the VM was able to detect the card and the SSD on it, but I couldn’t get it to boot my Win7 image instead of the empty SSD on the SATA Card. I also tried booting to a DVD Drive that I placed on the SATA Card. It recognized the dvd drive but kept on trying to boot the empty SSD and didn’t give me an option to boot the DVD.
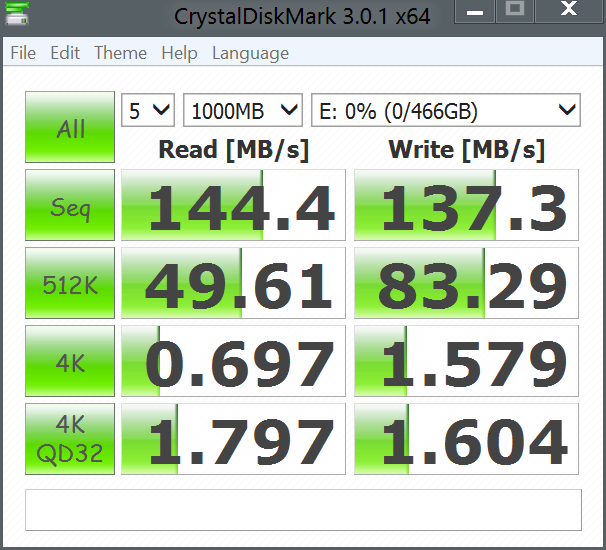
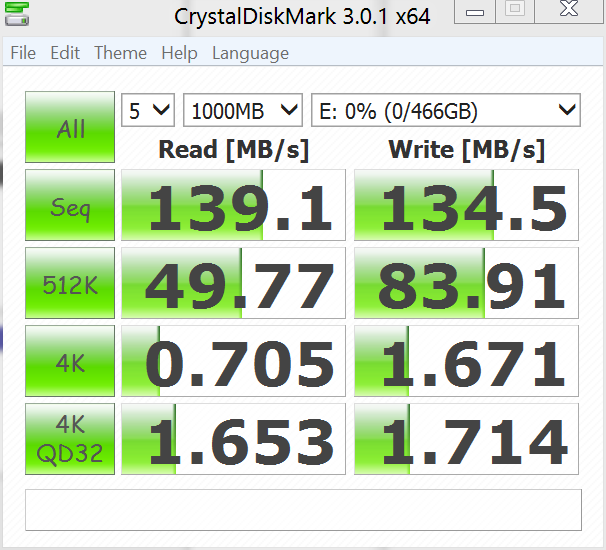
Finally I figured out that Dizzy was just passing through the /dev/sda1, which was the SSD connected to dom0. This worked great. I initially had performance issues as seen below.
Crucial M4 on SATA2 controller. IDE emulation passed via /dev/sda1 to VM
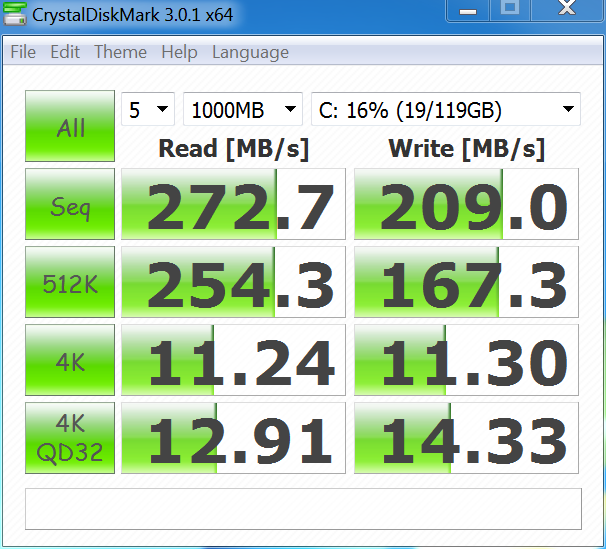
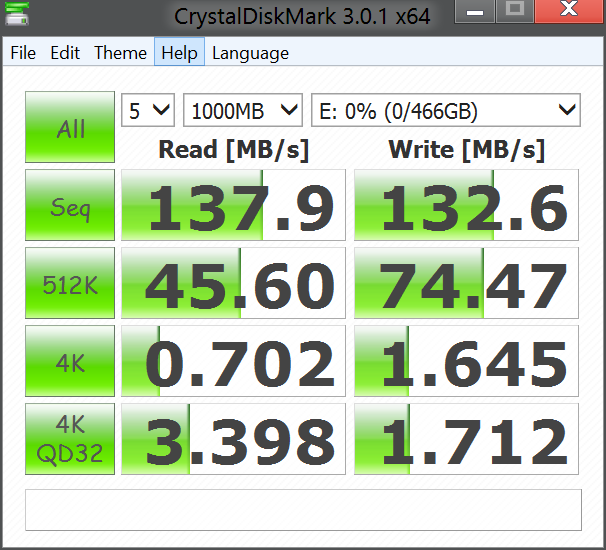
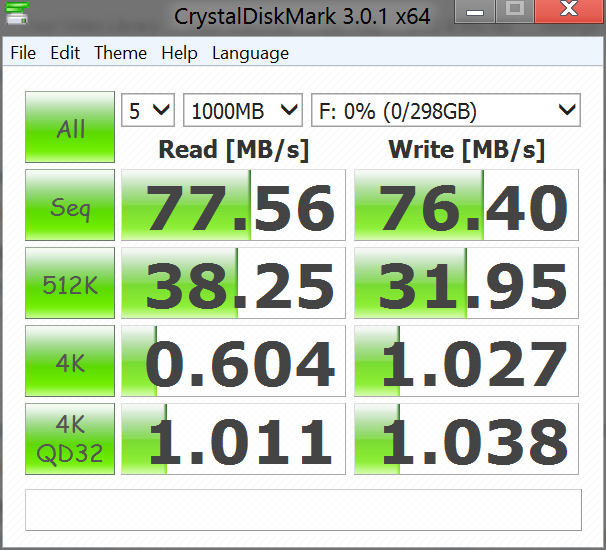
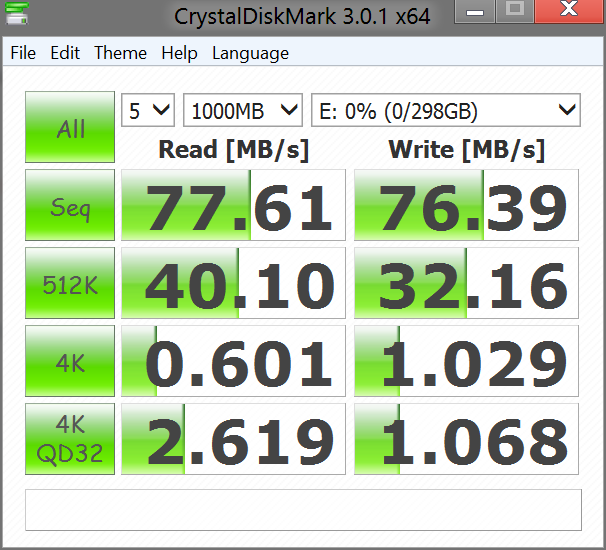
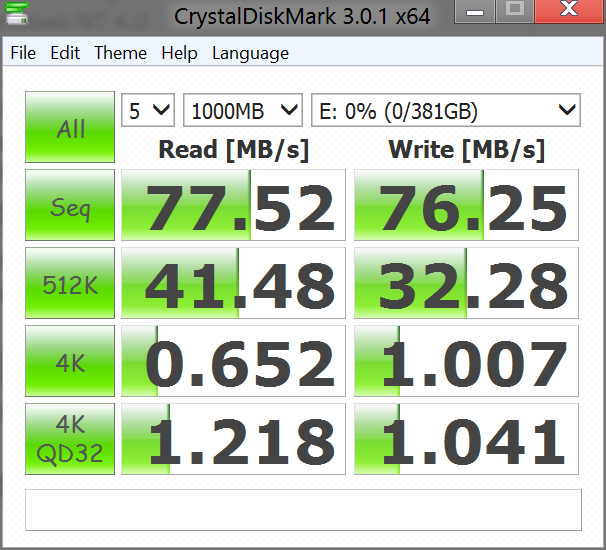
But then I put the M4 on a SATA3 controller and performance went up. Again passed through to domU from dom0 as /dev/sda1 in IDE emulation
Conclusion
This was a really fun project and I’m glad I did it. But unfortunately the audio crashing after a while, combined with the lack of persistant pci passthrough which makes this VM have to be manually started, are deal breakers for me. I’m going to try VMware’s ESXi implementation of VT-d next. If that doesn’t work, I’ll settle with Windows 8’s Hyper-V.
Maybe in a few years the Xen VT-d experience will have improved. For now, Onwards!
I previously used Blank Your Monitor + Easy Reading on Firefox to change all pages on the browser to black background and white text. Now that I’m mainly using Chrome, I didn’t have this functionality. I just found a way around it.


")